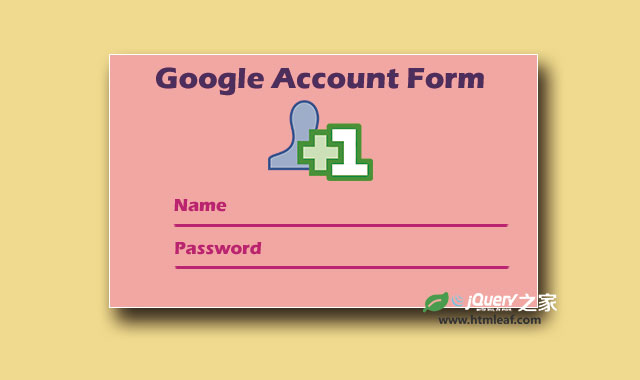

这是一款使用jQuery和CSS3打造的GOOGLE样式的用户登录界面特效。该登录界面特效中,右上角的小问号和错误提示小图标使用SVG来制作,用户名和密码输入框采用浮动标签特效,可点击的按钮上使用了很酷的点击波特效。整个登录界面简洁大方,互动性很强。
该用户登录界面使用HTML5的<errorp>标签来提示用户输入错误。
HTML结构
该GOOGLE样式用户登录界面的HTML结构使用标准的Form表单结构,图标使用<i>标签来包裹一个SVG图形,错误信息则用<erroru>来制作:
<div class="login">
  <i ripple>
    <svg xmlns="http://www.w3.org/2000/svg" viewBox="0 0 24 24">
    <path fill="#C7C7C7" d="..."/>
    </svg>
  </i>
  <div class="photo">
  </div>
  <span>Sign in with your Google Account</span>
  <form action="" id="login-form">
    <div id="u" class="form-group">
      <input id="username" spellcheck=false class="form-control" name="username" type="text" size="18" alt="login" required="">
      <span class="form-highlight"></span>
      <span class="form-bar"></span>
      <label for="username" class="float-label">Email</label>
      <erroru>
        Username is required
        <i>
        <svg xmlns="http://www.w3.org/2000/svg" viewBox="0 0 24 24">
            ...
        </svg>
        </i>
      </erroru>
    </div>
    <div id="p" class="form-group">
      <input id="password" class="form-control" spellcheck=false name="password" type="password" size="18" alt="login" required="">
      <span class="form-highlight"></span>
      <span class="form-bar"></span>
      <label for="password" class="float-label">Password</label>
      <errorp>
        Password is required
        <i>
        <svg xmlns="http://www.w3.org/2000/svg" viewBox="0 0 24 24">
            ...
        </svg>
        </i>
      </errorp>
    </div>
    <div class="form-group">
    <input type="checkbox" id="rem">
    <label for="rem">Stay Signed in</label>
    <button id="submit" type="submit" ripple>Sign in</button>
    </div>
  </form>
</div>
CSS样式
该登录界面的用户头像是使用CSS ::before和::after伪元素制作的。
.login .photo {
  position: relative;
  width: 100px;
  height: 100px;
  margin: 30px 135px;
  border-radius: 50%;
  background: rgb(223, 223, 223);
  border: 13px solid rgb(223, 223, 223);
  overflow: hidden !important;
  transform: rotate(-1deg);
}

.login .photo:before {
  position: absolute;
  content: '';
  width: 35px;
  height: 35px;
  top: 0px;
  right: 20px;
  border-radius: 50%;
  background: #aaa;
  border: 2px solid #fff;
  transform: scale(0);
  transition: 0.5s cubic-bezier(0.68, -0.55, 0.27, 1.55);
  -webkit-animation: user-head 0.5s 0s forwards;
  -moz-animation: user-head 0.5s 0s forwards;
  animation: user-head 0.5s 0s forwards;
}

.login .photo:after {
  position: absolute;
  content: '';
  width: 140px;
  height: 220px;
  top: 38px;
  right: -32px;
  border-radius: 50%;
  background: #aaa;
  border: 2px solid #fff;
  transform: translateY(36px);
  transition: 0.5s cubic-bezier(0.68, -0.55, 0.27, 1.55);
  -webkit-animation: user-body 0.5s 0.3s forwards;
  -moz-animation: user-body 0.5s 0.3s forwards;
  animation: user-body 0.5s 0.3s forwards;
}
浮动标签float-label使用绝对定位,当输入框聚焦或:valid的时候,浮动标签使用指定的过渡动画向上移动。浮动标签是一个非常有创意的设计,想了解浮动标签的设计方式可以查看这里:CSS表单元素浮动标签的设计技巧与实现方法。
.float-label {
  position: absolute;
  left: 0;
  top: 10px;
  font-size: 16px;
  color: #999;
  font-weight: 300;
  transition: 0.2s ease all;
  -moz-transition: 0.2s ease all;
  -webkit-transition: 0.2s ease all;
}
.form-control:focus ~ .float-label, .form-control:valid ~ .float-label {
  top: -15px;
  font-size: 12px;
}
该登录界面中还使用了一个有趣的特效-点击波特效。当在按钮上点击的时候,一个光圈从被点击的点开始,会像冲击波一样向外辐射。在HTML代码中,每个带有点击波特效的元素都有一个自定义的属性ripple。
[ripple] {
  position: relative;
  overflow: hidden;
  -webkit-transition: box-shadow .4s;
  -moz-transition: box-shadow .4s;
  -ms-transition: box-shadow .4s;
  -o-transition: box-shadow .4s;
  transition: box-shadow .4s;
  cursor: inherit;
}

[ripple] .touch {
  background: rgba(255, 255, 255, 0.3);
  pointer-events: none;
  border-radius: 100%;
}