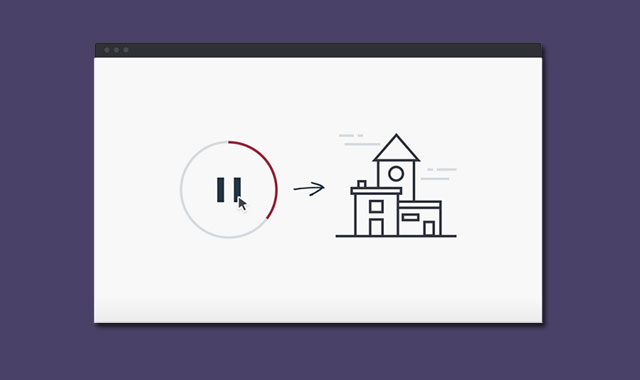

这个简要教程是关于如何使用snap.svg库和css来制作图标动画的教程。
、现在越来越多的网站开始使用SVG。随着大量高分辨率的显示器被广泛的使用,通过CSS媒体查询技术已经不能够满足同一张位图在不同显示器上显示相同效果的需求。我们需要依赖与矢量图形来完成这一工作。
在本教程制作的这个插件中,我们将一步步的使用CSS和Snap.svg来对图标完成一系列的动画效果。Snap.svg是Adobe公司的一个javascript SVG库。虽然对大多数浏览器对这个库的支持不够完美,但是我们可以从中学习到一些小技巧。
如果你刚刚接触SVG,下面的文章你可以用于学习参考:
创建SVG
最简单创建SVG文件的方法是使用矢量图形编辑器,如: Adobe Illustrator或Sketch。选择其中一款来创建图标,你使用这些编辑器创建的SCG 图标是能够通过程序转换为代码的。最简单的实现方法是将它保持为.SVG文件。然后使用文本编辑器打开即可看到代码。
请记住一点,使用多层的方式来创建图形是会影响代码输出的。
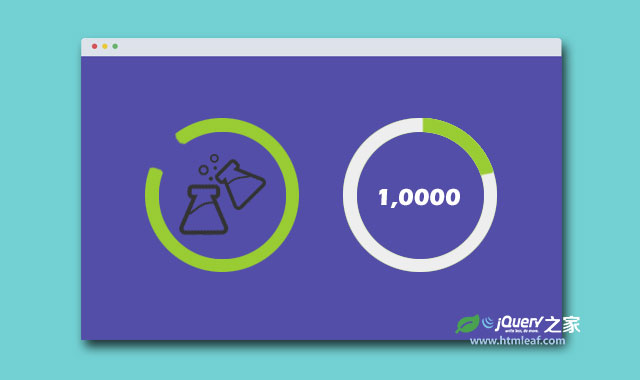
举个例子:我们的动画分为两步:一是圆形进度条加载,二是房子动画。看下图,如果关闭 cd-buildings 层,我们能够通过在该元素上使用 display:none 来在代码中使其不可见。在Illustrator中层和组都可以在SVG代码得以体现。在AI中,层的标题将以#id的方式在SVG代码中出现。
下面是第一个demo中如何在嵌入屏幕的手机界面中添加动画的css代码:

当使用AI输出.svg文件,使用默认的配置就可以了。特别提出的是,将 CSS Properties 设置为Style Elements,可以讲样式从内容中分离。
在使用矢量图形编辑器创建SVG文件时,你需要注意:
- 你创建的层和组将影响你的输出代码。
- 每个层都要给一个名字。
- 尽量使用简单的图形及去掉不必要的锚点(在AI中你可以试一下:object>Path>Simplify)。
- 尽量不要使用矢量化笔触。你可以在后面生成的代码中使用它们。
- 没有一个SVG矢量编辑器是完全兼容的。AI有自己的SVG过滤器,但并不保证所有的浏览器都兼容它。
SVG代码
在这里要推荐给大家一款自动清理SVG代码的工具 svgo-gui。
当我们使用AI输出了SVG文件,我们使用文本编辑器打开它来看一些代码:
<?xml version="1.0" encoding="utf-8"?>
<!-- Generator: Adobe Illustrator 18.1.0, SVG Export Plug-In . SVG Version: 6.00 Build 0)  -->
<!DOCTYPE svg PUBLIC "-//W3C//DTD SVG 1.1//EN" "http://www.w3.org/Graphics/SVG/1.1/DTD/svg11.dtd">
<svg version="1.1" xmlns="http://www.w3.org/2000/svg" xmlns:xlink="http://www.w3.org/1999/xlink" x="0px" y="0px" width="200px"
     height="200px" viewBox="0 0 200 200" style="enable-background:new 0 0 200 200;" xml:space="preserve">
<style type="text/css">
    .st0{fill:none;stroke:#D7DCE0;stroke-width:4;stroke-miterlimit:10;}
    .st1{fill:none;stroke:#A84D54;stroke-width:4;stroke-miterlimit:10;}
    .st2{opacity:0;fill:#FFFFFF;}
    .st3{fill:#223443;}
    .st4{fill:#FFFFFF;stroke:#223443;stroke-width:4;stroke-miterlimit:10;}
    .st5{fill:none;stroke:#223443;stroke-width:4;stroke-miterlimit:10;}
</style>
<g id="cd-loading">
    <g id="cd-circle">
        <circle id="cd-loading-circle" class="st0" cx="100" cy="100" r="77.5"/>
        <circle id="cd-loading-circle-filled" class="st1" cx="100" cy="100" r="77.5"/>
    </g>
    <g id="cd-play-btn">
        <rect x="84" y="78.1" class="st2" width="32" height="43.9"/>
        <polygon class="st3" points="84,78.1 116,100 84,121.9         "/>
    </g>
    <g id="cd-pause-btn">
        <rect x="81" y="80.1" class="st2" width="38" height="39.9"/>
        <rect x="81" y="80.1" class="st3" width="11" height="39.9"/>
        <rect x="108" y="80.1" class="st3" width="11" height="39.9"/>
    </g>
</g>
<g id="cd-buildings">
    <g id="cd-home-3">
        <rect id="cd-home-3-base" x="66" y="55" class="st4" width="58" height="123"/>
        <polygon id="cd-home-3-roof" class="st4" points="59.4,56 95,15 130.6,56         "/>
        <circle id="cd-home-3-window" class="st4" cx="95" cy="77" r="11"/>
    </g>
    <g id="cd-home-2">
        <rect id="cd-home-2-base" x="98" y="132" class="st4" width="69" height="46"/>
        <rect id="cd-home-2-roof" x="98" y="122" class="st4" width="69" height="10"/>
        <rect id="cd-home-2-door" x="141" y="155" class="st4" width="15" height="22"/>
        <rect id="cd-home-2-window" x="106" y="143" class="st4" width="25" height="9"/>
    </g>
    <g id="cd-home-1">
        <rect id="cd-home-1-base" x="29" y="109" class="st4" width="69" height="69"/>
        <rect id="cd-home-1-roof" x="23" y="100" class="st4" width="80" height="9"/>
        <rect id="cd-home-1-door" x="53" y="151" class="st4" width="20" height="27"/>
        <rect id="cd-home-1-window" x="53" y="121" class="st4" width="20" height="18"/>
        <rect id="cd-home-1-chimney" x="34" y="89" class="st4" width="11" height="11"/>
    </g>
    <line id="cd-floor" class="st5" x1="2" y1="178" x2="198" y2="178"/>
    <g id="cd-cloud-1">
        <line class="st0" x1="5" y1="13" x2="29" y2="13"/>
        <line class="st0" x1="35" y1="13" x2="44" y2="13"/>
        <line class="st0" x1="72" y1="27" x2="14" y2="27"/>
    </g>
    <g id="cd-cloud-2">
        <line class="st0" x1="191" y1="68" x2="159" y2="68"/>
        <line class="st0" x1="153" y1="68" x2="144" y2="68"/>
        <line class="st0" x1="179" y1="83" x2="133" y2="83"/>
    </g>
</g>
</svg>
可以发现,Illustrator 为我们创建了一些样式。代码页是否简洁,通过在AI中给层和组添加名字,我们可以在SVG代码结构中很容易的发现它们。
现在,如果想在同一个文件内容使用这个SVG图形,可以创建<svg></svg>标签,然后将上边的SVG代码粘贴到里面。
<body>
<svg version="1.1" x="0px" y="0px" width="200px" height="200px" viewBox="0 0 200 200" style="enable-background:new 0 0 200 200;" xml:space="preserve">
<title>Buildings</title>
<desc>3 minimal buildings with floating clouds</desc>
<style type="text/css">
    <!-- ... -->
</style>
    <!-- SVG elements here -->
</svg>
</body>
接下来,书写我们的CSS样式:
/* --------------------------------
Manage colors
-------------------------------- */
.cd-stroke {
  fill: none;
  stroke-width: 4;
  stroke-miterlimit: 10;
}
.cd-stroke-color-1 {
  stroke: #223443;
  fill: #f8f8f8;
}
.cd-stroke-color-1#floor {
  fill: none;
}
.cd-stroke-color-2 {
  stroke: #D7DCE0;
}
.cd-stroke-color-3 {
  stroke: #A84D54;
}
.cd-fill-color-1 {
  fill: #223443;
}
.cd-pointer {
  fill: #FFFFFF;
  opacity: 0;
}
现在我们可以删除SVG文件自带的样式,而使用我们的样式来渲染SVG图形。
在插件中,我们对SVG结构做了一些修改:将某些标签从上边移动到下边。原因是在SVG文件中,元素排在越后面它的 z-index 越高。还有就是修改了一些元素的坐标值。
<svg id="cd-animated-svg" version="1.1" x="0px" y="0px" width="200px" height="200px" viewBox="0 0 200 200" style="enable-background:new 0 0 200 200;" xml:space="preserve">
    <title>Buildings</title>
    <desc>3 minimal buildings with floating clouds</desc>
    <g id="cd-loading">
        <g id="cd-circle">
            <circle id="cd-loading-circle" class="cd-stroke cd-stroke-color-2" cx="100" cy="100" r="77.5"/>
            <circle id="cd-loading-circle-filled" class="cd-stroke cd-stroke-color-3" cx="100" cy="100" r="77.5"/>
        </g>
        <g id="cd-play-btn">
            <rect class="cd-pointer" x="84" y="78" width="33" height="44"/>
            <polygon class="cd-fill-color-1" points="84,78 116,100 84,122     "/>
        </g>
        <g id="cd-pause-btn">
            <rect class="cd-pointer" x="81" y="80" width="38" height="40"/>
            <rect class="cd-fill-color-1" x="81" y="80" width="11" height="40"/>
            <rect class="cd-fill-color-1" x="108" y="80" width="11" height="40"/>
        </g>
    </g>
    <g id="cd-buildings">
        <g id="cd-cloud-1">
            <line class="cd-stroke cd-stroke-color-2" x1="5" y1="13" x2="29" y2="13"/>
            <line class="cd-stroke cd-stroke-color-2" x1="35" y1="13" x2="44" y2="13"/>
            <line class="cd-stroke cd-stroke-color-2" x1="72" y1="27" x2="14" y2="27"/>
        </g>
        <g id="cd-cloud-2">
            <line class="cd-stroke cd-stroke-color-2" x1="191" y1="68" x2="159" y2="68"/>
            <line class="cd-stroke cd-stroke-color-2" x1="153" y1="68" x2="144" y2="68"/>
            <line class="cd-stroke cd-stroke-color-2" x1="179" y1="83" x2="133" y2="83"/>
        </g>
        <g id="cd-home-3">
            <polygon id="cd-home-3-roof" class="cd-stroke cd-stroke-color-1" points="59.4,55 95,15 130.6,55"/>
            <rect id="cd-home-3-base" class="cd-stroke cd-stroke-color-1" x="66" y="54" width="58" height="124"/>
            <circle id="cd-home-3-window" class="cd-stroke cd-stroke-color-1" cx="95" cy="77" r="11"/>
        </g>
        <g id="cd-home-2">
            <rect id="cd-home-2-base" class="cd-stroke cd-stroke-color-1" x="98" y="132" width="70" height="46"/>
            <rect id="cd-home-2-roof" class="cd-stroke cd-stroke-color-1" x="98" y="122" width="70" height="10"/>
            <rect id="cd-home-2-door" class="cd-stroke cd-stroke-color-1" x="141" y="156" width="16" height="22"/>
            <rect id="cd-home-2-window" class="cd-stroke cd-stroke-color-1" x="106" y="143" width="26" height="10"/>
        </g>
        <g id="cd-home-1">
            <rect id="cd-home-1-chimney" class="cd-stroke cd-stroke-color-1" x="34" y="89" width="11" height="11"/>
            <rect id="cd-home-1-base" class="cd-stroke cd-stroke-color-1" x="29" y="108" width="70" height="70"/>
            <rect id="cd-home-1-roof" class="cd-stroke cd-stroke-color-1" x="23" y="100" width="81" height="9"/>
            <rect id="cd-home-1-door" class="cd-stroke cd-stroke-color-1" x="53" y="150" width="20" height="28"/>
            <rect id="cd-home-1-window" class="cd-stroke cd-stroke-color-1" x="53" y="121" width="20" height="18"/>
        </g>
        <line id="cd-floor" class="cd-stroke cd-stroke-color-1" x1="2" y1="178" x2="198" y2="178"/>
    </g>
</svg>
现在SVG已经做好了动画准备。我们将svg 放置到一个.cd-svg-container的div中,让它相对于屏幕居中。设置max-width:100% 将使SVG具有响应性。为SVG设置overflow:hidden是为了那些“云”在画布中的动画。在这里IE浏览器可能会有一些BUG。
在#cd-pause-btn中的小方块.cd-pointer,这是为了是暂停按钮中间部分可以被点击,它被设置为opacity:0。
最后我们使用.no-js类来在浏览器不支持javascript时给出回调:不显示加载动画,只显示房子。
.cd-svg-container {
  width: 90%;
  max-width: 200px;
  margin: 0 auto 100px;
}
.cd-svg-container svg {
  display: block;
  overflow: hidden;
  max-width: 100%;
}
.no-js .cd-svg-container {
  height: 200px;
  background: url("../img/cd-icon.svg") no-repeat center center;
}
.no-js .cd-svg-container svg {
  display: none;
}
/* --------------------------------
Main elements - Loading
-------------------------------- */
#cd-loading {
  opacity: 1;
  visibility: visible;
  -webkit-transition: opacity .3s 0s, visibility 0s 0s;
  -moz-transition: opacity .3s 0s, visibility 0s 0s;
  transition: opacity .3s 0s, visibility 0s 0s;
}
#cd-loading.fade-out {
  opacity: 0;
  visibility: hidden;
  -webkit-transition: opacity .3s 0s, visibility 0s .3s;
  -moz-transition: opacity .3s 0s, visibility 0s .3s;
  transition: opacity .3s 0s, visibility 0s .3s;
}
#cd-play-btn, #cd-pause-btn {
  cursor: pointer;
}
#cd-pause-btn {
  pointer-events: none;
}
.play-is-clicked #cd-pause-btn {
  pointer-events: auto;
}
/* --------------------------------
Main elements - Buildings
-------------------------------- */
#cd-home-1-chimney, #cd-home-3-roof {
  visibility: hidden;
}
SVG动画
我们使用javascript而不使用SMIL 来制作SVG动画是为了兼容IE浏览器,关于SMIL 的知识,你可以查看这里。在动画开始的时候,我们需要隐藏#cd-buildings。为了做到这一点,我们需要修改一下html结构。
举个例子,来看#cd-home-1-door元素,它是第一个房子的左边的门。我们希望该元素开始的时候被隐藏,然后动画时使它的高度从0增长到28px。所以,在html结构中,我们将他的高度设置为0-height = "0",并增加一个自定义属性data-height = "28",后面就可以使用javascript来控制它们。
<rect id="cd-home-1-door" class="cd-stroke cd-stroke-color-1" x="53" y="150" width="20" height="0" data-height="28"/>
我们通过 Snap.svg 提供的animate()方法来制作动画。
var animatingSvg = Snap('#cd-animated-svg'),
    buildingDoor1 = animatingSvg.select('#cd-home-1-door');
buildingDoor1.animate({'height': buildingDoor1.attr('data-height')}, 300, mina.easeinout);
现在,“门”是从上往下增长的,我们希望相反的效果,所以将它旋转180度。
<rect id="cd-home-1-door" class="cd-stroke cd-stroke-color-1" x="53" y="150" width="20" height="0" transform="rotate(180 63 164)" data-height="28"/>
这里需要指出,开始时我们使用CSS来旋转它,这样做比在SVG中使用transform属性要好,但是IE11及以下的IE浏览器不支持在SVG上使用CSS transformations。
rotate()函数接受3个参数:第一个是旋转角度,第二个和第三个是旋转中心的坐标。
现在来关注加载动画。首先,我们隐藏暂停按钮。我们为它使用一个缩放(scale)的transformation。
<g id=&qout;cd-pause-btn&qout; transform=&qout;translate(100 100) scale(0)&qout;>
    <!-- .... -->
</g>
注意:scale()方法不能够想transform那样使用坐标原点(transform默认坐标原点是左上角)。要缩放一个元素,你可以通过给定一个比例因子,结合两个transform来实现:
transform="translate(-centerX(factor- 1) -centerY(factor- 1)) scale(factor)"
在我们的例子中,比例因子 factor=0,(centerX, centerY) = (100, 100),我们也为transform使用translate(100 100) 。
接着,我们需要制作圆形进度条动画。为了制作这个动画,我们使用两个svg属性 stroke-dasharray 和 stroke-dashoffset。 stroke-dasharray 指定圆形的高度和间隙, stroke-dashoffset用于制作加载动画。
var loadingCircle = animatingSvg.select('#cd-loading-circle-filled'),
    circumf = Math.PI*(loadingCircle.attr('r')*2);

loadingCircle.attr({
    'stroke-dasharray': circumf+' '+circumf,
    'stroke-dashoffset': circumf,
});
通过这个方法,我们设置圆和间隙都等于圆的周长。通过设置stroke-dashoffset: circumf 使得只有间隙可见。为了制作加载动画,我们使用javascript操控stroke-dashoffset 属性。
var playBtn = animatingSvg.select('#cd-play-btn').
    globalAnimation;

playBtn.click(function(){
    var strokeOffset = loadingCircle.attr('stroke-dashoffset').replace('px', '');
    //animate strokeOffeset desn't work with circle element - we need to use Snap.animate() rather than loadingCircle.animate()
    globalAnimation = Snap.animate(strokeOffset, '0', function( value ){
        loadingCircle.attr({ 'stroke-dashoffset': value })
        }, 1500, mina.easein
    );
});
注意:stroke-dashoffset 属性不能够使用animate()方法来制作动画(当它作为一个路径元素的时候)。这是我们为什么使用Snap.animate()方法,将动画返回对象保持到globalAnimation 变量中的原因-为了在用户点击暂停按钮时停止动画。
var pauseBtn = animatingSvg.select('#cd-pause-btn');

pauseBtn.click(function(){
    //pause the animation on the loadingCircle
    globalAnimation.stop();
});
当加载动画完成之后,我们使用相同的技术来完成房子和云的动画。