
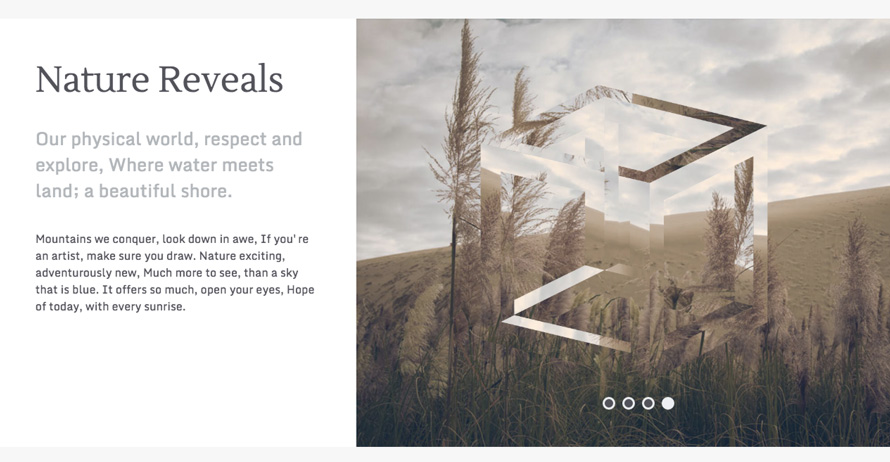
这是一款效果非常炫酷华丽的HTML5 canvas带棱镜效果的幻灯片特效。这个特效在每一个幻灯片的前面放置一个图形,并将图形制作为三棱镜效果,它底下的幻灯片图片会被“折射”到棱镜上面,形成一种棱镜折射效果。该效果中使用HTML5 canvas和纯JS来制作棱镜效果。
所有的现代浏览器都支持这个幻灯片特效,包括IE9。
制作方法
这个特效使用的主要技术是:首先调用和渲染一个遮罩层,它可以是SVG或一个PNG图片(重点在于图片是透明的),然后使用globalCompositeOperation来渲染幻灯片的各个图片。
globalCompositeOperation是canvas的属性,它可以让你定义一幅图片如何在另一幅图片上进行绘制。
默认情况下,当我们在已有的像素上绘制图像的时候,只是会覆盖那些已经存在的像素。而使用globalCompositeOperation属性,我们可以定义要绘制的图像作为一个遮罩层绘制在目标图像的上面。它有十二个复合操作,这个幻灯片特效中使用的是source-atop效果,它会以遮罩的形式显示图片,并且遮罩外的部分不会被显示出来。
制作这个效果的关键在于在图像前面绘制遮罩层。另外,由于开始的时候所有的像素都是不存在的,source-atop操作不会有任何效果。
为了创建效果,需要为棱镜的每一个面都折射出不同的图像,这需要使用分层技术,意思是每一个面都需要一个单独的canvas元素,然后将他们设置为绝对定位并排列成想要的图案。
这个特效需要多个canvas的原因是W3C 定义每一个canvas中只有一个CanvasRenderingContext2D对象。所以要同时为棱镜的不同部分使用不同的效果只能使用多个层。
HTML结构
这个幻灯片特效需要的HTML结构只是一个<div>,它里面会被添加canvas,和放置用于制作圆点导航按钮的无序列表。
<div class="container">
  <ul class="navigation"></ul>
</div>
同时还要在幻灯片初始化之前对需要用到的图片和遮罩进行预加载,否则在图片加载完之前会得到一个空的幻灯片。为了达到这个目的,插件中使用一个div.cache来包裹一系列需要使用到的图片和遮罩层svg。然后使用display: none将它隐藏,然后在window.onload时初始化插件。(实际上使用javascript来预加载图片效果会更加好。)
<div class="cache">
  <!-- masks -->
  <img src="img/masks/cube-a.svg">
  <img src="img/masks/cube-b.svg">
  <img src="img/masks/cube-c.svg">
  <!-- photos -->
  <img src="img/shoreditch-a.jpg">
  <img src="img/shoreditch-b.jpg">
  <img src="img/shoreditch-c.jpg">
</div>
CSS样式
下面是该幻灯片插件的基本样式。
.prism-slider {
  width: 1200px;
  max-width: 100%;
  height: 0;
  padding-bottom: 48%;
  position: relative;
}

.prism-slider canvas {
  width: 100%;
  position: absolute;
  top: 0;
  left: 0;
}

.navigation {
  width: 100%;
  position: absolute;
  bottom: 5%;
  text-align: center;
  list-style: none;
  z-index: 1;
}

.navigation li {
  border: 3px solid #eceff1;
  width: 18px;
  height: 18px;
  margin: 0 5px;
  background: #52525a;
  border-radius: 50%;
  display: inline-block;
  cursor: pointer;
}

.navigation .active {
  background: #eceff1;
}
JAVASCRIPT
该幻灯片插件使用的JavaScript分为两个模块:slideshow.js作为控制器,PrismSlider.js负责插件和渲染每一个canvas层。
先来看看PrismSlider的第一个函数:
/**
 * Create canvas element, get context, set sizes
 * and append to main container.
 */
PrismSlider.prototype.addCanvas_ = function() {

  this.canvas = document.createElement('canvas');

  this.context = this.canvas.getContext('2d');

  this.canvas.width = this.settings.container.sizes.w;
  this.canvas.height = this.settings.container.sizes.h;

  this.container.appendChild(this.canvas);
};
现在我们有了一个canvas元素,这时要添加和绘制遮罩层。
/**
 * Add Mask.
 * Call loadImage method with path and callback,
 * once the loading will be completed we'll replace
 * the string path (this.mask.source) reference with
 * the actual <img> object.
 */
PrismSlider.prototype.addMask_ = function() {

  var path = this.mask.source;
  var callback = this.renderMask_.bind(this);
  // Replace image path with <img> object.
  this.mask.source = this.loadImage_(path, callback);
};

/**
 * Draw mask.
 * Calculate center position and draw mask, width and height at 100% of the container sizes.
 */
PrismSlider.prototype.renderMask_ = function() {
  var centerX = this.canvas.width / 2 - this.settings.container.sizes.w / 2;
  var centerY = this.canvas.height / 2 - this.settings.container.sizes.h / 2;

  var w = this.settings.container.sizes.w;
  var h = this.settings.container.sizes.h;

  this.context.drawImage(this.mask.source, centerX, centerY, w, h);
};
上面的代码中使用了 loadImage 方法,由于这时浏览器已经缓存了所需要的图片和SVG遮罩,所以可以在这时无延迟的获取到SVG遮罩图像。
/** * Load image source from path and fire given callback, * return loadedobject. * @param {String} path The path of the file. * @param {Function} callback The callback to be executed when loading completed. * @return {Object} The JavaScript
object. */ PrismSlider.prototype.loadImage_ = function(path, callback) { var image = new Image(); image.onload = callback; // Path always after callback. image.src = path; return image; };
下载已经添加和绘制的遮罩层,接下来要以相同的手法添加幻灯片。
/**
 * Add Slides.
 * Call loadImage method for each image path in the slides array,
 * only when it's the first slide pass render callback,
 * when loading completed replace image path with  object.
 */
PrismSlider.prototype.addSlides_ = function() {

  this.slides.forEach(function(path, i) {
    // Render only first slide.
    var callback = (i === 0) ? this.renderSlide_.bind(this, i) : null;
    // Replace image path with  object.
    this.slides[i] = this.loadImage_(path, callback);

  }, this);
};
renderSlide_渲染回调函数有一些复杂:
- 它有两个参数,一个是
addSlides_循环的index数,另一个是一个progress值,目前还用不到。 - 要注意是如何计算出X坐标的值的,还要记住
i是一个0到幻灯片length之间的值。 - 只有在遮罩层被渲染的时候才使用图像复合操作。
- 最后在绘制图像之前为它们添加一些效果。
代码如下:
/**
 * Draw Slide.
 * Calculate frame position, apply composite operation
 * and effects on the image when there is a mask.
 * @param  {Number} i        The index used to get the img to render.
 * @param  {Number} progress The progress value.
 */
PrismSlider.prototype.renderSlide_ = function(i, progress) {

  // Set progress to 0 if Not a Number or undefined.
  progress = (isNaN(progress) || progress === undefined) ? 0 : progress;

  // Get img object from array.
  var slide = this.slides[i];

  // Calculate X position.
  var x = this.canvas.width * (i - progress);
  var y = 0;

  var w = this.canvas.width;
  var h = this.canvas.height;

  // Apply composite operation.
  if (this.mask) this.context.globalCompositeOperation = 'source-atop';

  this.context.save();

  if (this.mask) this.applyEffects_();

  // Draw slide.
  this.context.drawImage(slide, x, y, w, h);

  this.context.restore();
};
下面来看一下slideshow控制器。
现在,PrismSlider.js可以被实例化并生成canvas元素,调用图像并渲染它们。为了代码的整洁,插件中使用一个控制器来控制PrismSlider。这个控制器就是slideshow.js。下面来看看它的变量:
/**
 * Enum navigation classes, attributes and
 * provide navigation DOM element container.
 */
var navigation = {
  selector: '.navigation',
  element: null,
  bullet: 'li',
  attrs: {
    active: 'active',
    index: 'data-index'
  }
};

/**
 * Enum main element, sizes and provide
 * main DOM element container.
 * @type {Object}
 */
var container = {
  selector: '.container',
  element: null,
  sizes: {
    w: 1200,
    h: 780
  }
};

/**
 * Set of images to be used.
 * @type {Array}
 */
var slides = [
  'img/shoreditch-a.jpg',
  'img/shoreditch-b.jpg',
  'img/shoreditch-c.jpg',
  'img/graffiti-a.jpg',
  'img/graffiti-b.jpg',
  'img/graffiti-c.jpg'
];

/**
 * Set of masks with related effects.
 * @type {Array}
 */
var masks = [
  {
    source: 'img/masks/cube-a.svg',
    effects: {
      flip: 'Y',
      rotate: 167 // degrees
    }
  },
  {
    source: 'img/masks/cube-b.svg',
    effects: {
      flip: 'X',
      rotate: 90 // degrees
    }
  },
  {
    source: 'img/masks/cube-c.svg',
    effects: {
      flip: false,
      rotate: 13 // degrees
    }
  }
];

/**
 * Set global easing.
 * @type {Function(currentTime)}
 */
var easing = Easing.easeInOutQuint;

/**
 * Set global duration.
 * @type {Number}
 */
var duration = 2000;

/**
 * Container for PrismSlider instances.
 * @type {Object}
 */
var instances = {};
注意最后一个instances变量,它是一个空的对象,它将被作为“容器”来用于引用每一个canvas。
初始化的方法如下:
/**
 * Init.
 */
function init() {

  getContainer_();

  initSlider_();

  initPrism_();

  addNavigation_();

  addEvents_();
}

/**
 * Get main container element, and store in container element.
 */
function getContainer_() {
  container.element = document.querySelector(container.selector);
}

/**
 * Init Slides.
 * Create and initialise main background slider (first layer).
 * Since we'll use this as main slider no mask is given.
 */
function initSlider_() {

  instances.slider = new PrismSlider({
    container: container,
    slides: slides,
    mask: false,
    duration: duration,
    easing: easing
  });

  // Initialise instance.
  instances.slider.init();
}

/**
 * Init Masks.
 * Loop masks variable and create a new layer for each mask object.
 */
function initPrism_() {

  masks.forEach(function(mask, i) {
    // Generate reference name.
    var name = 'mask_' + i;

    instances[name] = new PrismSlider({
      container: container,
      slides: slides,
      mask: mask, // Here is the mask object.
      duration: duration,
      easing: easing
    });

    // Initialise instance.
    instances[name].init();
  });
}

/**
 * Add Navigation.
 * Create a new bullet for each slide and add it to navigation (ul)
 * with data-index reference.
 */
function addNavigation_() {
  // Store navigation element.
  navigation.element = document.querySelector(navigation.selector);

  slides.forEach(function(slide, i) {

    var bullet = document.createElement(navigation.bullet);

    bullet.setAttribute(navigation.attrs.index, i);

    // When it's first bullet set class as active.
    if (i === 0) bullet.className = navigation.attrs.active;

    navigation.element.appendChild(bullet);
  });
}

/**
 * Add Events.
 * Bind click on bullets.
 */
function addEvents_() {
  ...
}
在initSlider方法中创建了一个新的PrismSlider对象,并将mask设置为false,这是为了创建一个完整的背景图层。
在initPrism方法中,通过玄幻遮罩层数组,为每一个遮罩层创建一个新的实例并插入遮罩参数。
下面要做的事情就是这种动画效果。当用户点击圆点导航按钮的时候,slideAllTo事件就会被触发。
/**
 * Add Events.
 * Bind click on bullets.
 */
function addEvents_() {
  // Detect click on navigation elment (ul).
  navigation.element.addEventListener('click', function(e) {

    // Get clicked element.
    var bullet = e.target;

    // Detect if the clicked element is actually a bullet (li).
    var isBullet = bullet.nodeName === navigation.bullet.toUpperCase();

    // Check bullet and prevent action if animation is in progress.
    if (isBullet && !instances.slider.isAnimated) {
      // Remove active class from all bullets.
      for (var i = 0; i < navigation.element.childNodes.length; i++) {
        navigation.element.childNodes[i].className = '';
      }
      // Add active class to clicked bullet.
      bullet.className = navigation.attrs.active;

      // Get index from data attribute and convert string to number.
      var index = Number(bullet.getAttribute(navigation.attrs.index));

      // Call slideAllTo method with index.
      slideAllTo_(index);
    }

  });
}

/**
 * Call slideTo method of each instance.
 * In order to sync sliding of all layers we'll loop through the
 * instances object and call the slideTo method for each instance.
 * @param {Number} index The index of the destination slide.
 */
function slideAllTo_(index) {
  // Loop PrismSlider instances.
  for (var key in instances) {
    if (instances.hasOwnProperty(key)) {
      // Call slideTo for current instance.
      instances[key].slideTo(index);
    }
  }
}
正如上面的注释所描述的,slideAllTo方法会循环所有的实例,并调用PrismSlider.prototype.slideTo方法。
/**
 * Slide To.
 * @param {Number} index The destination slide index.
 */
PrismSlider.prototype.slideTo = function(index) {
  // Prevent when animation is in progress or if same bullet is clicked.
  if (this.isAnimated || index === this.slidesIndex) return;

  // Store current (start) index.
  this.prevSlidesIndex = this.slidesIndex;
  // Set destination (end) index.
  this.slidesIndex = index;

  // Calculate how many slides between current (start) and destination (end).
  var indexOffset = (this.prevSlidesIndex - this.slidesIndex) * -1;
  // Store offset always converted to positive number.
  this.indexOffset = (indexOffset > 0) ? indexOffset : indexOffset * -1;

  // Kickstart animation.
  this.animate_();
};
上面代码的关键点在于更新index和有多少个幻灯片需要进行动画。
最后两个动画的方法是简单的通过Date.now()与持续时间之和来计算结束时间。ticker方法是通过调用requestAnimationFrame方法来完成的。
/**
 * Animate.
 */
PrismSlider.prototype.animate_ = function() {

  // Calculate end time.
  var end = Date.now() + this.duration;

  // Mark animation as in progress.
  this.isAnimated = true;
  // Kickstart frames ticker.
  this.ticker_(end);
};

/**
 * Ticker called for each frame of the animation.
 * @param {Number} end The end time of the animation.
 */
PrismSlider.prototype.ticker_ = function(end) {

  // Start time.
  var now = Date.now();
  // Update time left in the animation.
  var remaining = end - now;

  // Retrieve easing and multiply for number of slides between stars
  // and end, in order to jump through N slides in one ease.
  var easing = this.easing(remaining / this.duration) * this.indexOffset;

  var i, progress, slide;

  // Select sliding direction.
  if (this.slidesIndex > this.prevSlidesIndex) {

    // Sliding forward.
    progress = this.slidesIndex - easing;

    // Loop offset and render slides from start to end.
    for (i = 0; i <= this.indexOffset; i++) {
      slide = this.slidesIndex - i;
      this.renderSlide_(slide, progress);
    }

  } else {

    // Sliding backward.
    progress = this.slidesIndex + easing;

    // Loop offset and render slides from start to end.
    for (i = 0; i >= this.indexOffset; i++) {
      slide = this.slidesIndex + i;
      this.renderSlide_(slide, progress);
    }
  }

  // Under 50 milliseconds reset and stop.
  if (remaining < 50) {
    // Set default value.
    this.indexOffset = 1;
    // Make sure slide is perfectly aligned.
    this.renderSlide_(this.slidesIndex);
    // Mark animation as finished.
    this.isAnimated = false;
    // Stop.
    return;
  }

  // Kickstart rAF with updated end.
  window.requestAnimationFrame(this.ticker_.bind(this, end));
};